How to Import & Export in KPI Fire
Help Resource:
Quick Tips:
- General rule: If you can export a file, the same format can typically be used to modify & re-import the records.
- If the ID column is empty, a new record will be created. If the ID number is included in the import file, the existing record will be updated.
- The order/ sequence & column headers on import templates MUST match the values in the import templates.
Contents
The following record type imports & exports are available:
- Projects
- Project Benefits
- Metrics
- Goals
- Users
- User Export
- User Import
- Export User Certifications
- Import User Certifications
Metric Import
There are 2 different metric Import options available: Option 1 is best for initial creation of many metrics, Option 2 is best for adding interval data to existing metrics.
Metric Import for Initial Setup (Option 1)
Scenario: Use this import option for creating a large number of metrics and
Attributes:
Permissions required:
● License Type: Administrator
Location & Instructions:
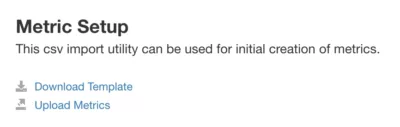
1. Go to Settings>>API Settings>>Metric Setup
2. Choose Download Template to access the import template
Metric Import for Adding Interval Data (Option 2)
Scenario: Use this import option for periodic imports of new data to the same metrics, or adding interval data to metrics.
Permissions required:
● License Type: Administrator
Location & Instructions:
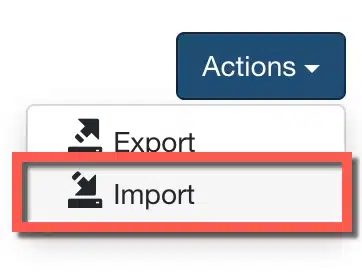
1. Go to Metric tab
2. Click Action:Import
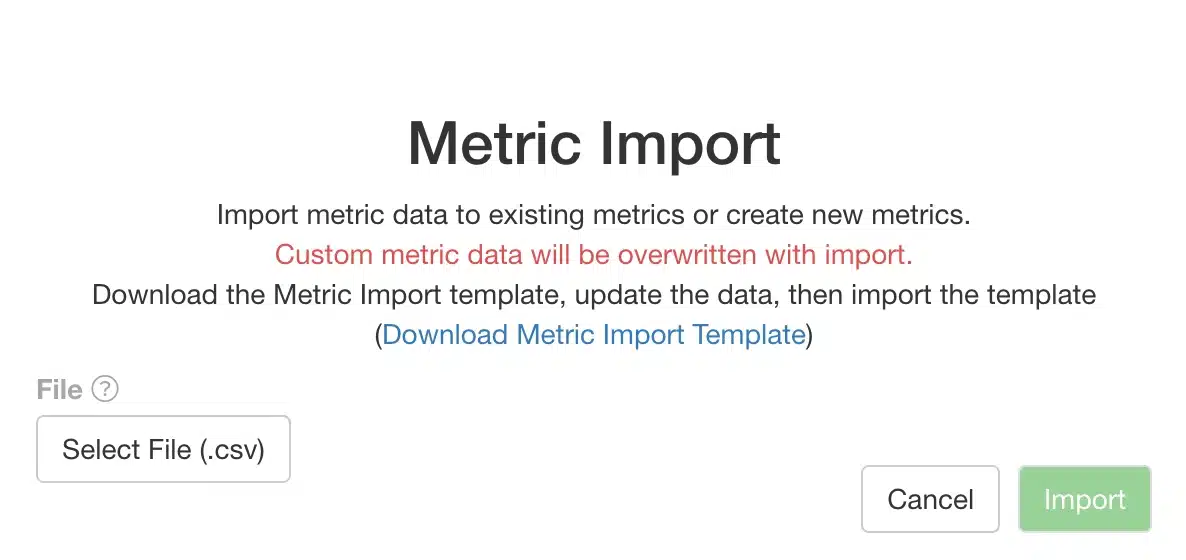
How to get the metric import template:
(from time to time this format may change, please refer to the template in app over this help document)

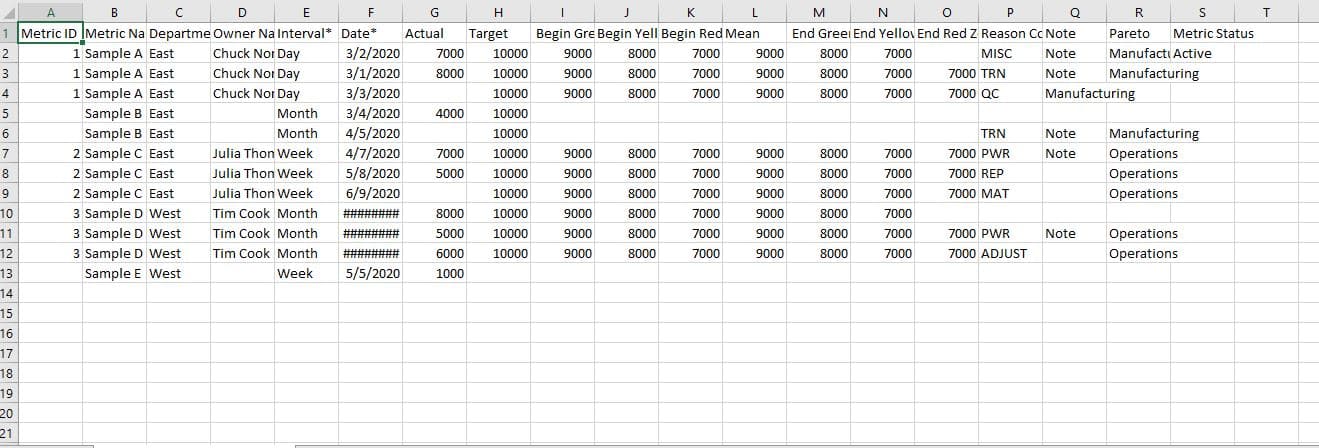
Metric Setup Columns
| Column | Details | Optional / Required |
|---|---|---|
| Metric ID | Numerical value created by KPI Fire when a new record is created. This column will be empty if creating new records. If a value is included in this column it will update the matching metric. |
Optional |
| Metric Name | String text | Required |
| Department | Text Valid values must match an existing Department. |
|
| Owner | String Value Must match an existing user. You must create the user before importing metrics for that user. |
Required |
| Interval | Determines the interval configuration for the metric. Valid Values are: Hour, Day, Week, Month, Quarter, Year |
Optional Default value is Month |
| Notes (objective) | String text Max length is ?? | Optional Default is: NULL |
| Category | Optional Default is: NULL |
|
| Parent Metric Name | A number corresponding to another parent Metric ID |
Optional Default is: NULL |
| Format | Valid values: | Optional Default is: # |
| Direction | Valid Values: Bigger, Smaller Optional | Optional Default: Bigger is Better |
| Data Mode | Optional default is Sum All |
|
| Status | Valid Values: Active, Archive | Optional Default: Active |
| Visibility | Optional Default is: Visible To All |
Metric import template (download template)
https://app.kpifire.com/site-assets/csv/metric_import_template_2020.csv
Metric Export feature is available from:
- Metrics Tile View: Will include all records based on global filters & users access.
- Metric Bowling View
- Metric Report: Metric List View
- Metric Data Tab
Pro Tip: Use the Export template, make your edits/additions, then Import
One of the easiest ways to update metric data is to use the exported CSV file as a template for your imports.
- Date column should be with time in case of custom import.
- The pareto list should be already selected in the metric.
- The all the reason code which you are using should be present in pareto list on admin settings(new reason code and pareto list can not be created through import)
- Only till custom field 2 data can be imported(I will make task for this enhancement)
Import Failure Reasons
- Column headers not matching template requirements.
- Pareto reasons are not in a pareto list
- Pareto list name must be included
- date format not recognized as valid value
- a-z value passed in number only column
Goal Import & Goal Export
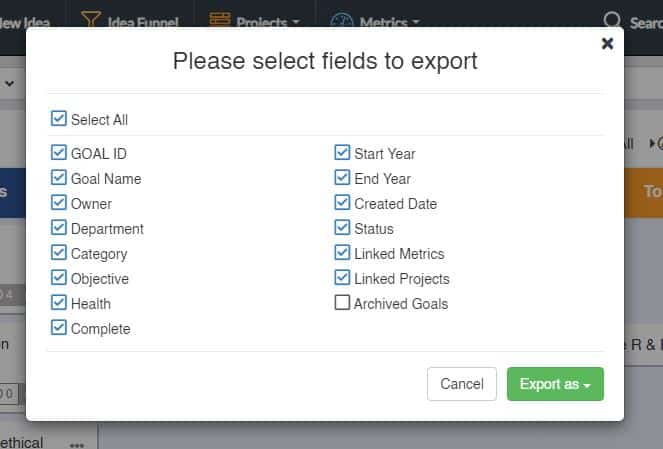
Goal Export
License Type Required
- Administrator, Executive, Strategy
Goal Import
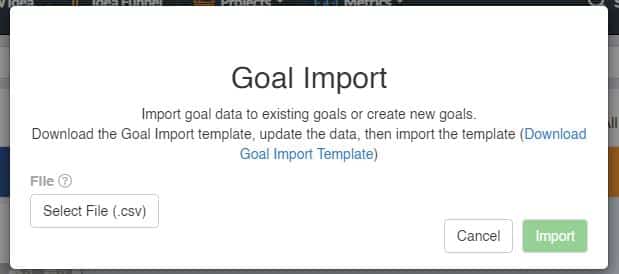
Goal Import will create a new record if:
- ID column is empty.
Will update the existing record if:
- id, Goal Name, Owner matches imported values
https://app.kpifire.com/site-assets/csv/goal_import_template_2019.csv
| Field | Valid Values | Required/ Optional |
|---|---|---|
| GOAL_ID | Empty, Number | Optional. If empty, a new goal will be created. |
| Goal Name | Any text string | Required |
| Owner | A Valid user name in format of: Firstname Lastname |
Optional. Login user will be used as creator if no valid username is provided here. |
| Description | Long text string | Optional |
| Department | String | Required (Must match existing department names) |
| Category | String | Optional (Must match existing Category values if included) |
| Start Year | YYYY | Optional. Current Year will be used if not included. |
| End Year | YYYY | Optional. Current Year will be used if not included. |
| Status | NULL (empty) active archive |
Optional: default is “active” Include this value as ‘archive’ to archive existing goals via import. |
Project Export & Project Import
Tip: Get Familiar with Export data first, before doing Imports. To do this, you may need to manually create a few records, then do an export.
We recommend getting familiar with the Project Export feature BEFORE doing a project import. Why? Because this will help you understand the column names and valid values that are acceptable on the project import.
Project Export Options
-
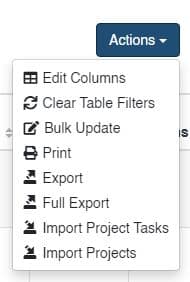
- Go to Project List
- Click Actions: Select Export OR Full Export
Project Export: Export vs Full Export
- Export is best for a quick CSV or Excel export. You can choose selected columns during the export routine. This export creates a single page CSV/XLS file.
- Full Export will create an multi-page Excel workbook with multiple data tabs.
Project Import
There are 4 Options for Importing Project related data
Types of Project Import Options
- Projects Import (Primary project details such as project name, owner/leader, status, and workflow)
- Project Tasks Import : For importing the task within a project.
- Project Benefits Import: for Importing Target or Actual benefits.
- Project Benefit Budgets Import : for Importing Individual Annual or monthly budget values
Project Import
Pre-Import Checklist:
- Departments should already be created.
- Workflows should already be created.
Project Import Instructions:
- Go to Project List
- Click Actions button: Select Import Projects
- Follow Instructions provided in Project Import Wizard:
- Download the provided Import Template.
- Upload .csv formatted file.
Tips:
- Required fields for Project Import are: Project Title(Project Name), Workflow, Department, Team Lead.
- If a project number is included the matching existing record will be updated. If no project number is provided, a new record will be created.
- Most frequent issues are: Department Names do not match/ Not yet created, Workflow Name not matching or not provided.
Project Tasks Import:
- Go to Project List
- Click Actions button: Select Import Project Tasks
- Follow Instructions provided in Project Import Wizard:
- Download the provided Import Template.
- Upload .csv formatted file.
Tips:
- Required fields for Project Import are: Project #, Task Group Name, Task Name*, Task Owner
- Optional fields: Task Due Date, Duration (in days), Description, Parent Task ID, Status (To Do, Doing, Done), Priority, Sequence, Flag, Task ID.
- The project must exist before you can import tasks to the project.
- If Task ID is included, the existing task will be updated. If no TaskID is provided, a new tasks will be created.
Import to Project Custom Fields:
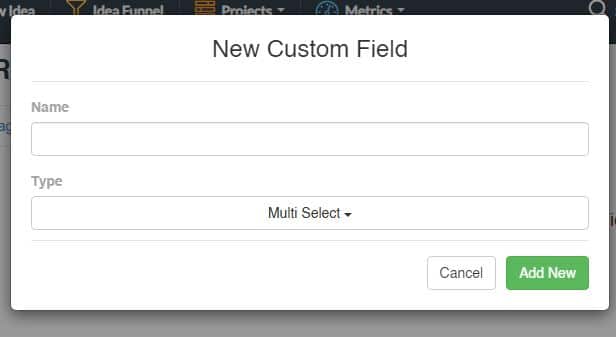
Note: Before you can import custom field attributes to projects, the custom fields must be created. If you have already created your custom fields you can skip this step:
To create custom field for projects:
- Go to: Settings>> Categories/Tags/Pareto /Custom fields
- Click Create New Custom Field
Notes about Importing Custom Field Values:
- Imported values will replace existing values. For multi-select fields, this means any existing values may be removed if the imported file does not contain the same values.
Project Benefit Import
Requires Admin License.
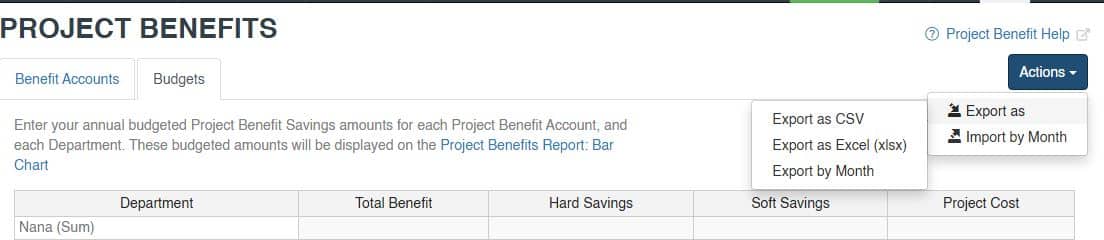
Project Benefit Import
Importing Project Benefit Budgets
- Choose the export to get a template you can use for adding your desired project benefits.
- Use the same template for importing.
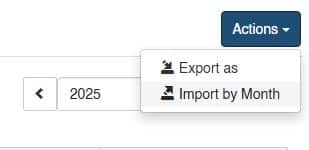
To Import values “by month” Choose the Export by Month & Import by Month opttions.
User Import & Export
Tip: You can use the User Export option to help see the formatting values for new records for license type.
License Type Required:
- Admin or Executive License
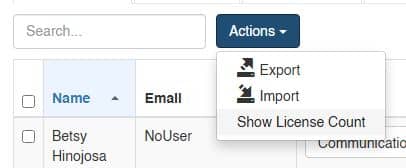
Where is it located:
Settings>> Users>> Current Users Tab>> Action Button
Required Fields for Importing Users:
- First Name
- Last Name
- Email Address
- Department
- License Type

User Import Tips:
- Valid Values for License Type are: Administrator License, Executive License, Strategy License, Project License, Team Member License, Idea License, View Only License, No Access
- Department Name. New Departments WILL be created via User import. Values here should match the Departments in your account. If you have variation in the department names, you could end up with unintended duplicate departments.
- See more information about User License Types.
Relationship Import (goal -metric-project)
Instructions Pending publication. Please contact your account manger for details on this import option.


