How to Configure KPI Fire SAML Option using Office 365 & Azure Active Directory
Setting up Single Sign on with SAML will allow users in your organization to access your KPI Fire account without requiring a separate login credentials. The access will be controlled by your existing Identity Provider, Azure (or similar), Active Directory.
3 Phases or 3 Configuration Options for Single Sign On (SSO) Setup:
Phase 1: SSO Optional or Identity Provider Initiated. (IDP) This allows you to configure KPI Fire as an app inside your Identity Provider (Azure,etc) and access KPI From there. This phase can be completed independant from Phase 2 & Phase 3. New KPI Fire users are added IN KPI Fire.
Phase 2: Force SSO from www.KPIFire.com If you want to force all users in your organization to use your Single Sign On Identity access, you can request this “force SSO” option to be enabled in your account via KPI Fire support. If enabled, any user who attempts to login to your account from app.kpifire.com (or similar) will be redirected to your identity management system before granting access.
Phase 3: Automated Provisioning. If you choose to enable this phase/option your organization can manage all user access to KPI Fire AND create new users in KPI Fire by adding the users to groups inside of your Identity Management (SSO ) System.
Note: There may be other ways to configure SAML with KPI Fire, this is just one scenario.
Also, see this helpful resource from Microsoft:
- Add KPI Fire as “Gallery App” (Easier Setup, Newest Option as of 4/21)
- Add KPI Fire as Non-Gallery App” (More Options, Only option prior to 4/21)
- Microsoft Tutorial: Configure KPI Fire for automatic user provisioning
Prerequisites:
- A KPIFire.com account with an Admin License.
- Azure Active Directory access for setting up a new Enterprise Application. ( portal.azure.com )
This setup requires 2 parts; Part 1 is configuring your Active Directory and Part 2 is configuring the KPI Fire settings.
Settings on Azure Side for SSO and User Provisioning
1. Adding Kpifire from the gallery
To configure the integration of Kpifire into Azure AD, you need to add Kpifire from the gallery to your list of managed SaaS apps.
- Sign in to the Azure portal using either a work or school account, or a personal Microsoft account.
- On the left navigation pane, select the Azure Active Directory service.
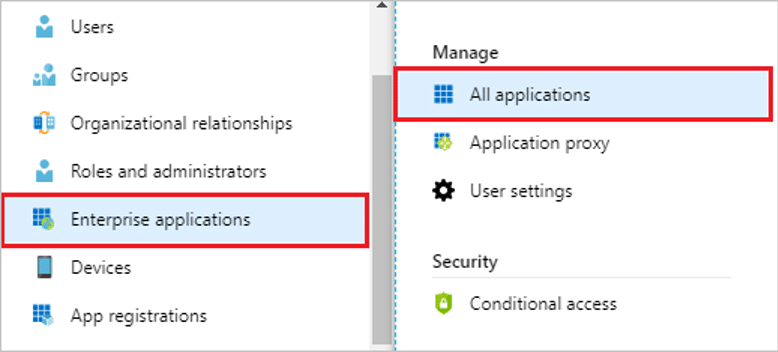
- Navigate to Enterprise Applications and then select All Applications.
- To add new application, select New application.
- In the Add from the gallery section, type Kpifire in the search box.
- Select Kpifire from results panel and then add the app. Wait a few seconds while the app is added to your tenant.
2. Configure single sign-on in azure portal
- In the Azure portal, on the Kpifire application integration page, find the Manage section and select Single sign-on.
- On the Select a Single sign-on method page, select SAML.
- On the Set up Single Sign-On with SAML page, click the edit/pen icon for Basic SAML Configuration to edit the settings.
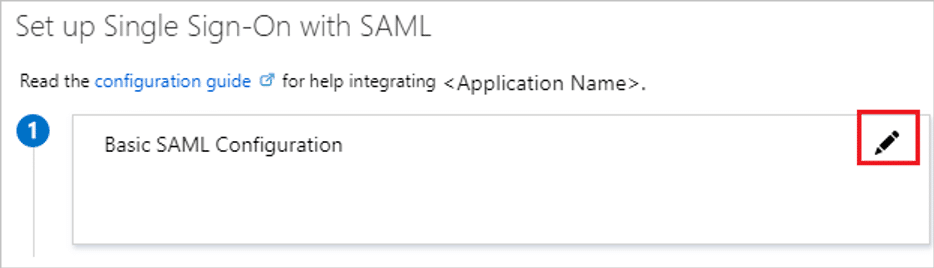
- On the Basic SAML Configuration section, enter the values for the following fields:
- a. In the Identifier text box, type a URL using the following pattern: https://app.kpifire.com
- b. In the Reply URL text box, type a URL using the following pattern: https://app.kpifire.com/api/auth/saml//login
- c. Click Set additional URLs.
- d. In the Relay State text box, type a URL using the following pattern: : https://app.kpifire.com/#/metrics
- e. In the Logout URL textbox, type url using the following pattern: https://app.kpifire.com/api/auth/saml//logout
- Your Kpifire application expects the SAML assertions in a specific format, which requires you to add custom attribute mappings to your SAML token attributes configuration. The following screenshot shows the list of default attributes, whereas nameidentifier is mapped with user.userprincipalname. Kpifire application expects nameidentifier to be mapped with user.mail, so you need to edit the attribute mapping by clicking on Edit icon and change the attribute mapping.

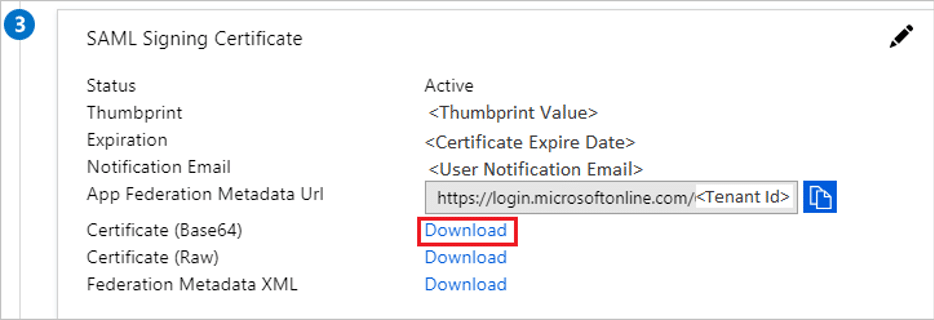
- On the Set up Single Sign-On with SAML page, in the SAML Signing Certificate section, find Certificate (Base64) and select Download to download the certificate and save it on your computer.
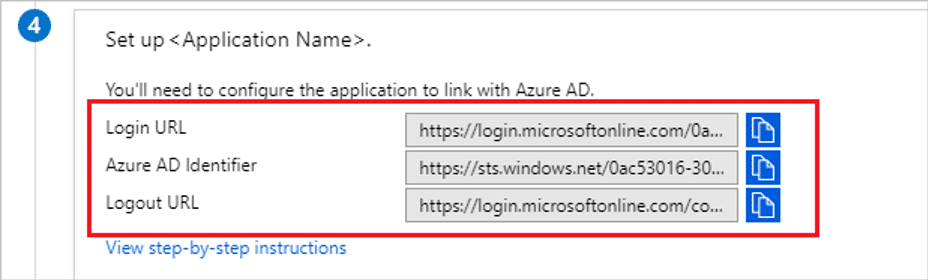
- On the Set up Kpifire section, copy the appropriate URL(s) as per your requirement.
- a. Login URL
- b. Azure AD Identifier
- c. Logout URL
3. Configure User Provisioning on Azure portal
This section guides you through the steps to configure the Azure AD provisioning service to create, update, and disable users and/or groups in Kpifire based on user and/or group assignments in Azure AD.
To configure automatic user provisioning for Kpifire in Azure AD:
- Sign in to the Azure portaland select Enterprise Applications, select All applications, then select Kpifire.
- In the applications list, select Kpifire.

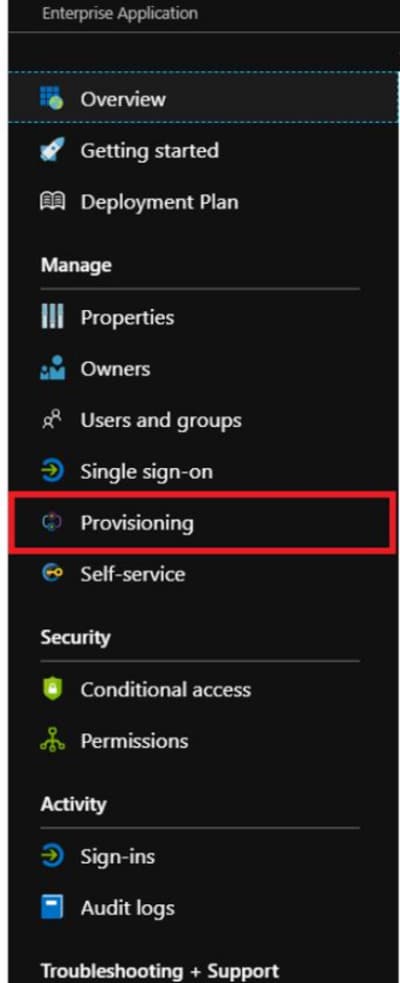
- Select the Provisioning.
- Set the Provisioning Mode to Automatic.
- Click User & Groups and add groups added above in section assigning users from available group names as shown in table.
| Group Name (must contain one of these values) |
License Type (to be granted in KPI Fire) |
Priority (7 takes precedence over 1) |
|---|---|---|
| Kpifire.Admin | Admin | 7 |
| Kpifire.Executive | Executive Viewer | 6 |
| Kpifire.Strategy | Manager | 5 |
| Kpifire.Project | User | 4 |
| Kpifire.TeamMember | Team Member | 3 |
| Kpifire.Idea | Idea Creator | 2 |
| Kpifire.Viewer | Viewer | 1 |
- Under the Admin Credentials section, input the Tenant URL and Secret Token of your Kpifire account. Examples of these values are:
- In the Tenant URL field, add the following url: https://app.kpifire.com/api/scim.
- In the Secret Token field, populate the secret token received from Kpifire.
- Upon populating the fields shown in Step 7, click Test Connection to ensure Azure AD can connect to Kpifire. If the connection fails, ensure your Kpifire account has Admin permissions and try again
- In the Notification Email field, enter the email address of a person or group who should receive the provisioning error notifications and check the checkbox – Send an email notification when a failure occurs.
- Click Save.
- Under the Mappings section, select Sync Only assigned users and groups.
- Review the user attributes that are synchronized from Azure AD to Kpifire in the Attribute Mapping The attributes selected as Matching properties are used to match the user accounts in Kpifire for update operations. Select the Save button to commit any changes.
- To configure scoping filters, refer to the following instructions provided in the Scoping filter tutorial.
- To enable the Azure AD provisioning service for Kpifire, change the Provisioning Status to On in the Settings
- When you are ready to provision, click Save.
This operation starts the initial synchronization of all users and/or groups defined in Scope in the Settings section. The initial sync takes longer to perform than subsequent syncs, which occur approximately every 40 minutes as long as the Azure AD provisioning service is running. You can use the Synchronization Details section to monitor progress and follow links to provisioning activity report, which describes all actions performed by the Azure AD provisioning service on Kpifire.
For more information on how to read the Azure AD provisioning logs, see Reporting on automatic user account provisioning.
Connector Limitations
- Kpifire does not support group renames today. This means that any changes to the displayName of a group in Azure AD will not be updated and reflected in Kpifire.
- The value of the mail user attribute in Azure AD is only populated if the user has a Microsoft Exchange Mailbox. If the user does not have one, it is recommended to map a different desired attribute to the emails attribute in Kpifire.
- If no group is matched, a Viewer license will be assigned to the new user.
- Microsoft SCIM requires up to 40 minutes to complete initial sync.
Settings on Kpifire SSO
- To automate the configuration within Kpifire, login with your admin account and Navigate to Kpifire Settings > SAML – Single Sign On(SSO) and do the following.
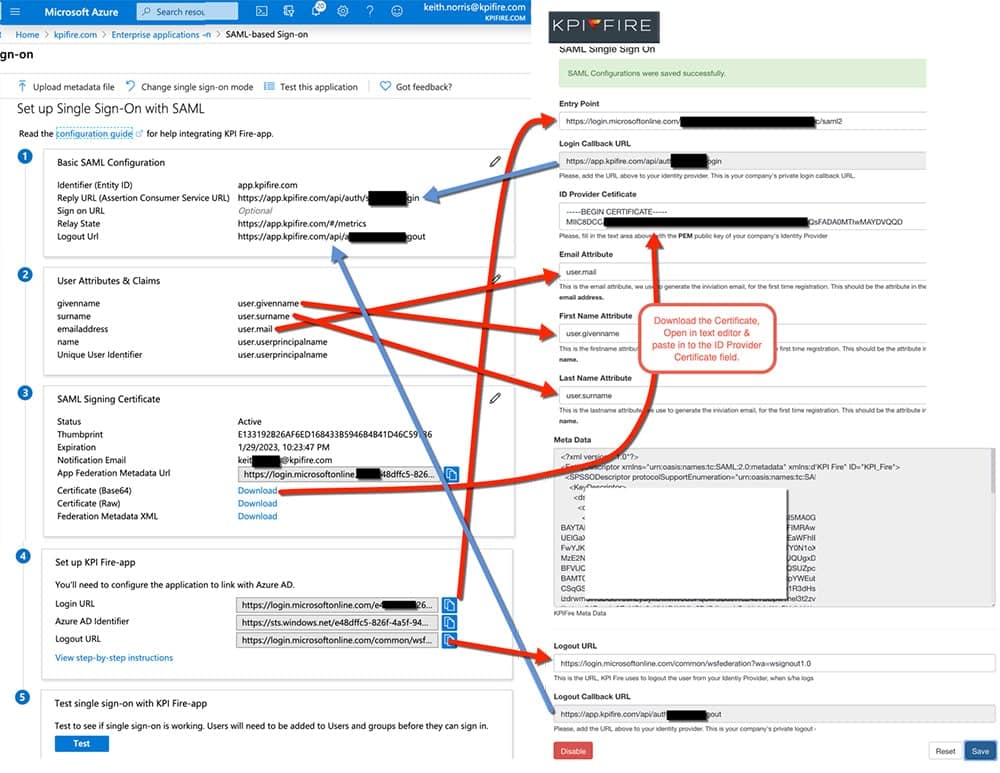
- In the Identity provider Entity ID box, paste the Azure AD Identifier that you copied from the Azure portal.
- In the Identity provider SSO URL box, paste the Login URL that you copied from the Azure portal.
- Open the downloaded certificate from the Azure portal in a .txt file, copy the value (without the Begin Certificate and End Certificate lines), and then paste it in the Public X509 certificate box.
- Click Save Configuration.
Contact you KPI Fire Account Manager
Your account will need to be approved/enabled by KPI Fire before your SSO config will work. Please make sure you are in contact with your account manager if you intend to use/test this feature.
Test SSO
- Login to azure portal
- Navigate to Enterprise Application -> my application
- Click on the application -> Single sign on
- Then Click on test this application , then sign-in as current user.
- user will be redirected to Kpifire with login.
Troubleshooting Issues/ Errors
- After initial settings are configured in your KPI Fire account, a server restart may be required before certificate can be validated.
- Confirm Entity ID Value: Most common value: https://app.kpifire.com/
- Audience Mismatch? Check error log or message on screen for expected vs received value. Put expected value in audience attribute value in app.kpifire.ocm
Setup Configuration Option: Provisioning without SCIM
- KPI Fire may be able to support provisioning without SCIM in some cases. Contact Support for this option as it requires manual setup.
